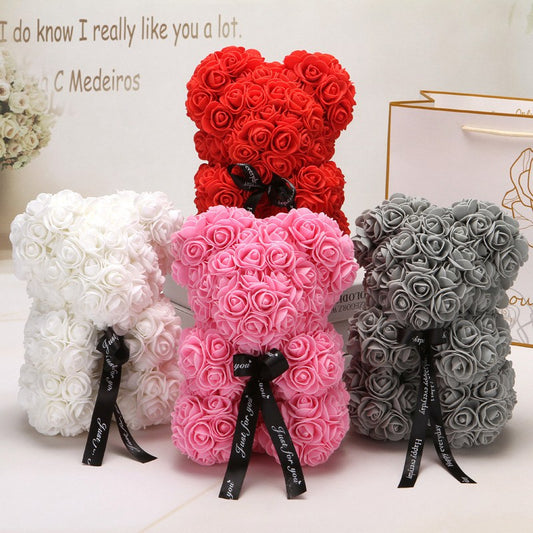
DIY Rose Bear
A rose bear is an impressive piece of art that is made by combining two of the best things in the world: "roses and teddies." Roses are the ultimate symbol of love and appreciation, while the teddy bear itself is a representation of comfort, care, and affection. When you put these two things together, you get the perfect gift that is sure to be cherished by the special people in your life. Whether it’s for a birthday, anniversary, or just because, a "rose bear" is sure to put a smile on their face. And the best part? You can make one yourself. Yes, you can make a DIY Rose Bear and gift it to your loved ones. The "DIY rose bear project" is easy to do and only requires a few supplies. But the end result is an alluring rose bear, all created by yourself. With this DIY rose bear you can show your affection in the most creative way and make someone feel very special.
A rose bear DIY is a creative and unique way to give a gorgeous gift, that your friends and family will absolutely adore. So, what are you waiting for? Get started on your own DIY rose bear teddy project today.
Why Try Rose Bear DIY
There is nothing more satisfying than making something with your own hands. The feeling of accomplishment and pride that comes with creating something yourself is unlike any other. One DIY project that is sure to please is making a "rose bear." Not only is the process of DIY rose teddy bears relatively simple, but the end result is an adorable bear covered in roses that will last for many years to come. All you need is a few supplies and a little bit of time and you'll be able to create your own rose bear.
Here are the reasons why you should try a DIY rose bear:
Gifting Purposes
There's something special about giving a homemade gift. It shows that you took the time and effort to make something unique, just for your loved ones. And what could be more special than a DIY Rose Bear? All you need is some fake roses, a foam teddy bear, hot glue, and a little bit of patience. The end result is a captivating bear that your special one will cherish forever. Whether you're making this for "Valentine's Day", "Mother's Day", or a "Birthday", your recipient is sure to appreciate the thoughtfulness that went into their one-of-a-kind present.
Unwinding & Relaxation
Crafting can be therapeutic. It's a great way to take your mind away from stressful thoughts and focus on the task at hand. The repetitive motions involved in making a DIY rose teddy bear can be calming and relaxing, providing you with a much-needed break from reality. It can be meditative, calming, and satisfying. And when you're done, you have something unique that you made yourself. What could be better than that? So, when you're feeling overwhelmed or stressed, take some time for yourself and make a rose bear! You'll be glad you did.
The bottom line is that making a "DIY rose bear" is a fun, creative, and therapeutic experience. If you're looking for a unique gift idea or simply want to unwind and relax, DIY rose bears are the way to go!
How To Make A DIY Rose Bear
Rose bears are all the rage these days, and we can see why! They’re cute, cuddly, and captivating. Rose bears are remarkable gifts, whether you’re trying to show your significant other how much you care, or simply want to put a smile on somebody’s face. Rose teddy bears are not that difficult to make! With our step-by-step guide, you can easily create a DIY rose bear of your own.
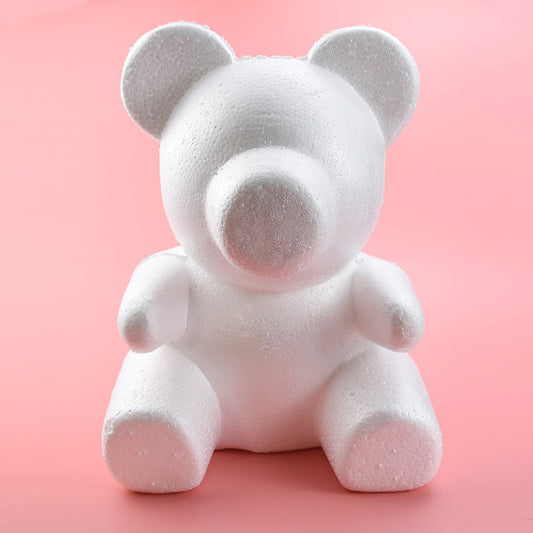
What You’ll Need
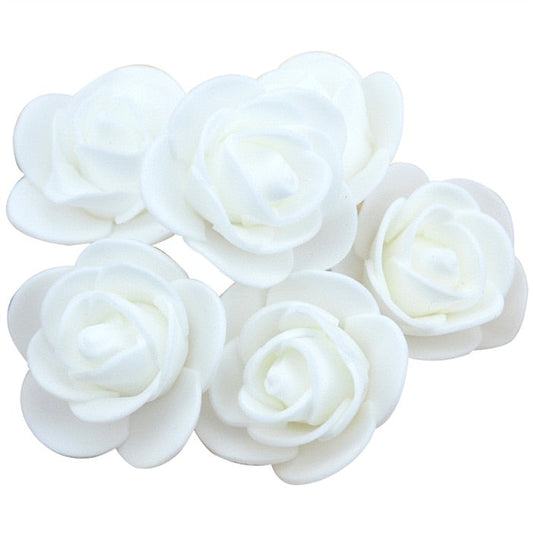
- Synthetic roses (of your desired color)
Step 1: Cut the roses
Start by cutting the stems of the synthetic roses. You’ll want to make sure that you cut them relatively close to the flower. So that the roses will fit nicely on the teddy bear, and look more aesthetically pleasing.
Step 2: Prep the teddy bear
Now it’s time to prep the teddy bear for the roses. Locate a good spot on the teddy bear to start attaching the roses. We recommend starting from the bottom and working your way up.
Step 3: Attach the roses
Using hot glue, start attaching the roses to the teddy bear. We recommend doing this one at a time; that way you can better control the placement of the roses. Once you’re happy with the placement, move on to the next rose.
Step 4: Repeat
Keep attaching roses until you have covered the entire bear with roses. Be careful not to use too much hot glue, as it may leave spots on the roses.
Step 5: Allow drying
Once you’re done attaching all the roses, set the bear aside and allow it to dry for a few hours. And that’s it! You’ve now successfully created a DIY rose teddy bear.
Your Creativity In Rose Bear DIY
You can personalize your DIY rose bear with a special message by adding a small piece of paper with a handwritten note to the bear before gifting it. Attach the note to the bear with hot glue or tape. You can add ribbons, bows, and other embellishments to make it extra special. Try different colors of roses, or even mix and match! Remember when it comes to making a DIY rose bear, "the sky is the limit." So have some fun with it and let your creativity shine!
FAQs
Q: Can I make a DIY rose bear with any color of roses?
A: Yes, of course, you can make your DIY rose bear with any color of roses that you like. Whether it be black or white or the traditional red, it's all up to you.
Q: What is the best way to store my DIY teddy rose bear?
A: The best way to store your DIY rose bear is in a cool and dry place. Try not to expose it to too much sunlight or heat as this may cause damage to the roses.
Q: I'm not very good at crafting, will I be able to make a DIY rose bear?
A: Of course! Anyone can make a DIY rose teddy bear. Just follow the instructions and you make a beautiful rose bear. Remember, practice makes perfect.
Q: How can I make a rose bear box?
A: You can make a rose bear box by using any type of transparent box. Just make sure that the box is big enough to fit your DIY rose bear. You can wrap the box with ribbons, bows, and other decorations to make it look more special.
 Sale
Sale